Jump to content

CigarPass Cigar Forum & Community

Welcome to Cigar Pass, the internet's friendliest and most knowledgeable cigar forum. We have over a decade of useful cigar information, reviews and thousands of active members around the world. Join today and start making new cigar friends. We hope you enjoy our forum, and decide to make CP your home.

Sign In or Register to gain full access to our forum. By registering with us, you'll be able to discuss, share and private message with other members of our community. You'll also be able to instant message, join live video virtual herfs, and have your own photo gallery -- all free.


Photo

Y'alls thoughts on a humidor design


  • Please log in to reply
31 replies to this topic

#1 Asel.mike

Asel.mike

    Professional nerd

  • Members
  • PipPipPipPipPip
  • 469 posts
  • Gender:Male
  • Location:Katy, Texas

Joined: 16-November 11

Posted 12 April 2012 - 01:25 AM

I'm thinking of making a 150-200 ct. humidor. I was inspired by a wine crate I saw and I've decided to use 3/8" formaldehyde-free cabinet grade plywood for the whole thing. The cost is not prohibitive, seeing as a sheet is $40-60, and thats enough for probably 2 humi's if I'm careful.

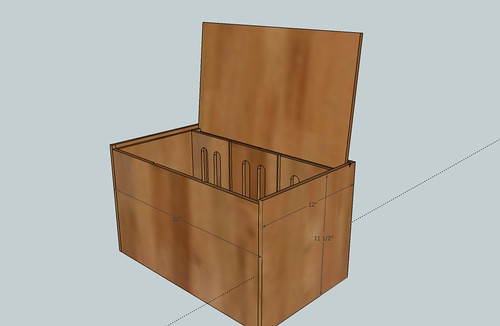
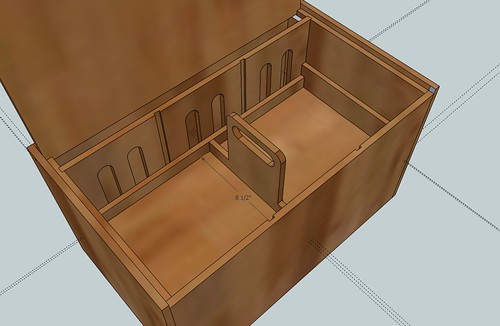
The box would have outside dimensions of 11.5"x12"x20"
Posted Image

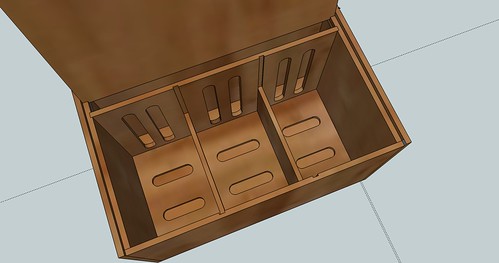
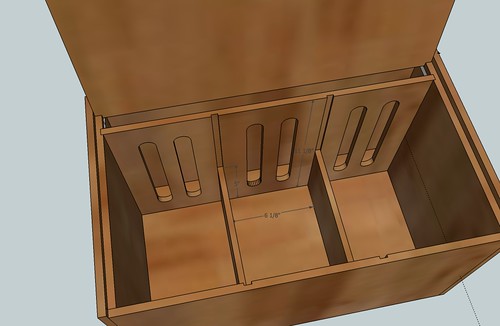
Here's the inside with a view of the bottom. These dividers would be removable for boxes. However, they are spaced appropriately for a 25 ct. box in each section. The spaces between dividers are about 6"x5"x9".
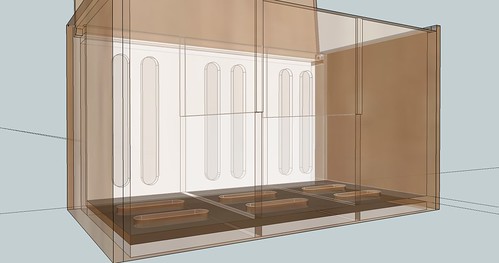
Also, for humidification, a false back wall is included. It has 6 long vertical holes for airflow to all the lower and upper sections. The beads would hang in bags behind the false wall.
Posted Image

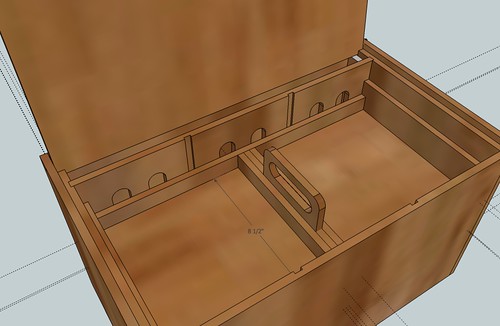
The first singles tray sits above the box storage area. Its 1.5" deep, but has a 2" lip on both ends to allow space between the singles trays for airflow. The lip would also allow for stacking singles.
Posted Image

The second singles tray is the same as the first, except it has a hole in the middle to allow the handle from the first tray to come through to grab.
Posted Image

If anybody has any criticisms please share, so I can improve my design.
Thanks!

#2 wkoti

wkoti

    Flaky Flakerton

  • Members
  • PipPipPipPipPipPipPip
  • 2,859 posts
  • Gender:Male
  • Location:Aurora, CO

Joined: 05-July 09

Posted 12 April 2012 - 02:27 AM

Make it a 2000 count, you'll need it. Just saying... Looks nice though!

#3 JHolmes763

JHolmes763

    Drinkin' the koolaid

  • Members
  • PipPipPipPipPipPipPip
  • 4,103 posts
  • Gender:Male
  • Location:Belgium

Joined: 12-October 06

Posted 12 April 2012 - 04:10 AM

Nice design. Would there be issues with the wood warping since there's only the one thin plywood wall?

#4 MadMonk

MadMonk

    Member

  • Members
  • PipPipPipPipPipPipPip
  • 3,354 posts
  • Gender:Male
  • Location:South

Joined: 21-February 08

Posted 12 April 2012 - 06:02 AM

How do you plan to join the pieces?

#5 Asel.mike

Asel.mike

    Professional nerd

  • Members
  • PipPipPipPipPip
  • 469 posts
  • Gender:Male
  • Location:Katy, Texas

Joined: 16-November 11

Posted 12 April 2012 - 07:11 AM

The pieces are small enough that I wasn't too concerned about war page, I guess I could double up though.
The woood would be joined by butt joints or dado joints with glue and nails

#6 broblues

broblues

    17 mo to go

  • Members
  • PipPipPipPipPipPipPip
  • 1,486 posts
  • Gender:Male
  • Location:Indiana

Joined: 27-October 10

Posted 12 April 2012 - 07:18 AM

On the small one I built (100 sticks), I added a slightly raised slatted bottom for circulation under the sticks. Seems to work real well.

Edited by broblues, 12 April 2012 - 07:21 AM.


#7 Asel.mike

Asel.mike

    Professional nerd

  • Members
  • PipPipPipPipPip
  • 469 posts
  • Gender:Male
  • Location:Katy, Texas

Joined: 16-November 11

Posted 12 April 2012 - 07:35 AM

In the bottom of the trays?

#8 broblues

broblues

    17 mo to go

  • Members
  • PipPipPipPipPipPipPip
  • 1,486 posts
  • Gender:Male
  • Location:Indiana

Joined: 27-October 10

Posted 12 April 2012 - 07:46 AM

In the bottom of the trays?


No, a second bottom of the actual humidor. Raised it enough for about 1/4" of free-air space so I could lay loose sticks in the bottom as well.

Edited by broblues, 12 April 2012 - 07:47 AM.


#9 kann

kann

    One Leg Of Fury.

  • Members
  • PipPipPipPipPipPipPip
  • 915 posts
  • Gender:Male
  • Location:Kaiserslautern, Germany

Joined: 29-April 11

Posted 12 April 2012 - 09:01 AM

That's a really cool design! Any sort of handle or grip indentations planned for the top tray? I like it a lot.

#10 BSchmidt1981

BSchmidt1981

    Member

  • Members
  • PipPipPip
  • 171 posts
  • Gender:Male
  • Location:Boise, Idaho

Joined: 24-September 11

Posted 12 April 2012 - 11:46 AM

I can't speak to the construction or materials that you are thinking about using. I would however encourage you to have slots cut in your top tray as you see in most humidor trays. The false back may allow for proper humidification of the tray but why risk it? Make sure you post pictures as you go through the building process. Have fun!

#11 Asel.mike

Asel.mike

    Professional nerd

  • Members
  • PipPipPipPipPip
  • 469 posts
  • Gender:Male
  • Location:Katy, Texas

Joined: 16-November 11

Posted 12 April 2012 - 04:00 PM

Alright, so we're thinking a false bottom, and slots in the bottoms of the trays.

#12 _Deon_

_Deon_

    Smoke Em If You Got Em

  • Members
  • PipPipPipPip
  • 385 posts
  • Gender:Male
  • Location:Detroit, Michigan

Joined: 16-September 11

Posted 12 April 2012 - 04:43 PM

Looks good from here!

#13 Asel.mike

Asel.mike

    Professional nerd

  • Members
  • PipPipPipPipPip
  • 469 posts
  • Gender:Male
  • Location:Katy, Texas

Joined: 16-November 11

Posted 12 April 2012 - 04:50 PM

The new tray with ventilation.
Posted Image

Bottom with ventilation.
Posted Image

X ray view of new vents on the bottom.
Posted Image

#14 Tall Paul

Tall Paul

    "insecure little bitch"

  • Members
  • PipPipPipPipPipPipPip
  • 3,513 posts
  • Gender:Male
  • Location:Derry, NH

Joined: 11-May 11

Posted 12 April 2012 - 04:53 PM

Vey cool ideas you have. I can't wait to see this bad boy being built!

Paul

Also bad ass design work mike!

#15 CBoukal

CBoukal

    Member

  • Members
  • PipPipPipPipPipPipPip
  • 916 posts
  • Gender:Male
  • Location:Omaha, NE

Joined: 09-December 11

Posted 12 April 2012 - 05:05 PM

Very nice!!! can't wait to watch it take shape.

#16 Ward

Ward

    Member

  • Members
  • PipPipPip
  • 154 posts
  • Gender:Male
  • Location:Pittsburgh, PA

Joined: 05-March 12

Posted 12 April 2012 - 05:37 PM

I'm going to be addicted to seeing this progress. The design graphics and idea so far are fantastic as expected.

#17 MadMonk

MadMonk

    Member

  • Members
  • PipPipPipPipPipPipPip
  • 3,354 posts
  • Gender:Male
  • Location:South

Joined: 21-February 08

Posted 12 April 2012 - 05:53 PM

I like the idea of the humidification along the rear wall. That will service all levels. The relief on the bottom will aid circulation, as do your slots in the trays as well.
Just make sure that your glue will not be toxic or outgas. Just call the company and talk to an application engineer or look for the Material Safety Data Sheet (MSDS).
I will enjoy watching this come to fruition.

#18 Asel.mike

Asel.mike

    Professional nerd

  • Members
  • PipPipPipPipPip
  • 469 posts
  • Gender:Male
  • Location:Katy, Texas

Joined: 16-November 11

Posted 13 April 2012 - 12:13 AM

I like the idea of the humidification along the rear wall. That will service all levels. The relief on the bottom will aid circulation, as do your slots in the trays as well.
Just make sure that your glue will not be toxic or outgas. Just call the company and talk to an application engineer or look for the Material Safety Data Sheet (MSDS).
I will enjoy watching this come to fruition.


I'm planning on using my normal wood glue. (the same stuff I used for my current humidor)
It's food safe for things like cutting boards so I assumed it would be okay. I think calling the manufacturer just to be sure.

#19 broblues

broblues

    17 mo to go

  • Members
  • PipPipPipPipPipPipPip
  • 1,486 posts
  • Gender:Male
  • Location:Indiana

Joined: 27-October 10

Posted 13 April 2012 - 07:10 AM


I like the idea of the humidification along the rear wall. That will service all levels. The relief on the bottom will aid circulation, as do your slots in the trays as well.
Just make sure that your glue will not be toxic or outgas. Just call the company and talk to an application engineer or look for the Material Safety Data Sheet (MSDS).
I will enjoy watching this come to fruition.


I'm planning on using my normal wood glue. (the same stuff I used for my current humidor)
It's food safe for things like cutting boards so I assumed it would be okay. I think calling the manufacturer just to be sure.


OK, Brother. It's time for you to work your magic. Have fun.

#20 Vicster

Vicster

    Social identity theory

  • Members
  • PipPipPipPip
  • 367 posts
  • Gender:Male
  • Location:Lehigh Valley, Pa

Joined: 09-November 11

Posted 13 April 2012 - 08:11 AM

Looks like a great project. Nice CAD work also, what program are you using?


0 user(s) are reading this topic

0 members, 0 guests, 0 anonymous users